YES, PHOTOSHOP’S PATTERN libraries include dozens of interesting patterns that you can use to fill selected areas of your designs. But what should you do when you need a different pattern that will precisely fit into your specific design? Make one yourself, of course! Designing your own patterns in Photoshop is super easy once you know the basics of pattern design and how to create seamless repeats using the Off set Filter.
Custom patterns can be created with either a square or rectangular layout. In this exercise you’ll learn how to create a simple square format web pattern from a preset Photoshop shape. Later, on your own, you can use these same steps to create custom patterns from your own designs.
HINT: Keep in mind that once you add a pattern in Photoshop, its attributes cannot
be changed. Th erefore, always save the fi le you used to create the pattern in case you
want to create new, similar patterns with diff erent colors, sizes, eff ects, and so on.
STEP 1 Press Ctrl+N/Ô+N to launch the New dialog box and create a new Web document
with the dimensions of 300×300 pixels. Once the document opens, use the Color panel to set your
foreground and background colors to any two colors you fi nd appealing. For example, you might
set your foreground to white and your background to a purple with the hex value of #632c82.
STEP 2 Press U to select the Custom Shape tool from your toolbar (or press Shift +U until you have it), make sure that the Shape Layers option is selected on the Options bar, and then click on the Custom Shape Picker drop-down menu at the top of your screen. You need to access a shape from another shape library, so click the Pattern pop-up panel menu to view the list of available shape libraries. Select Ornaments and, when the dialog box opens asking whether you want to replace the current shapes with the shapes from ornaments, press the Append button. Scroll down in the Custom Shape Picker to the bottom of the ornaments and select the design called Floral Ornament 4, as shown in Figure 2-1.
STEP 3 Drag out a medium-sized fl oral ornament shape onto the center of your document while pressing the Shift key to constrain proportions, and then release your mouse. Press V to switch your cursor to the Move tool and reposition the shape so that it is centered inside your document window. If necessary, use the arrow keys, guides, rulers, and alignment tools to fi ne-tune the shape’s placement. Figure 2-2 shows an example of how this might look.
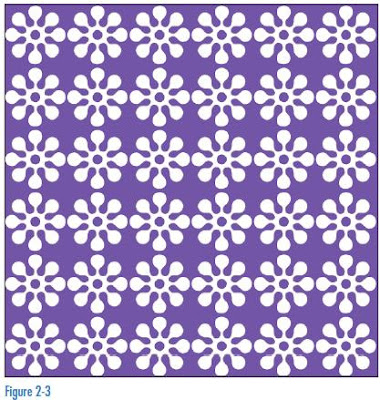
STEP 4 If you were to make a pattern of this design as it exists now, it would look nice but be a little boring, as the shapes would automatically line up in a neat symmetrical, grid-like fashion, like the example in Figure 2-3. To add a little more dynamism to the pattern, duplicate the shape layer by dragging the shape layer onto the Create a New Layer button found on the Layers panel.
STEP 5 Now comes the interesting part. Select Filter>Other>Off set to open the Off set dialog box. If you can’t see the Other menu option, click Show All Menu Items. The selected shape layer must be rasterized before you can use the offset filter, so when the alert dialog box appears, click the OK button. Make sure the Undefined Areas is set to Wrap Around and then set the horizontal and vertical fields to half the document’s dimensions. For example, this file is 300×300 pixels, which means you’ll want to set each of the fields to 150 pixels. If the Preview button is checked, you should now see how your rasterized layer has been quartered with each piece placed into one of the document’s four corners, while your original shape layer is still displaying in the center of your document window, as shown in Figure 2-4. Click OK to close the Off set dialog box.
STEP 6 Now you’ll add your pattern to Photoshop. Press Ctrl+A/Ô+A to select the entire document and select Edit>Define Pattern. When the Pattern Name dialog box appears, give your new pattern a name (such as Bloboids) and click OK. Your new pattern is now saved and can be used at any time! To see how your new pattern looks, open a new 600×600-pixel Web document, click the Create New Fill or Adjustment Layer button on the Layers panel, select Pattern from the top of the pop-up menu, and when the Pattern Fill dialog box appears, click the arrow on the Pattern Picker button to select your new pattern. Click OK and you’re done. Patterns can be used to fill an entire document window or any selected shape, like the heart in Figure 2-5.


Tidak ada komentar:
Posting Komentar