Tampilkan postingan dengan label tutorial. Tampilkan semua postingan

Senin, 04 Juli 2011

Windows XP Tips and Trick

You stick with Windows XP, and can you blame? But it is still possible to teach the faithful ol 'us some new tricks...

Give Your Hard Drive a New Icon
Grab IconsExtract (free http://tinyurl.com/2p7c7x) to extract icons from your computer there. When you find one you like, save it in the root directory of the drive you want to change (for example, C:\ Cool_Icon.ico). Next, create a file with Notepad and edit the line you can read [autorun] and the second line, write icon = Cool_Icon.ico. Save and name the file and restart autorun.ini.


Alter the Scroll Bar’s Dimensions
Wider scroll bar can make navigation easier it has a touch screen, and users can benefit from the addition of properties offered by narrowing the scroll bar. Whatever your destination, open the Control Panel Display Properties, click the Appearance tab, click Advanced, select from the menu bar to scroll to the bottom and go wild!


Install Google Desktop, then Hack It!
Google Desktop (free, http://desktop.google.com) throws all of Windows built-in search, but really kicks into high gear the search with the groove, you need to change some settings. Settings menu, make sure that HTTPS is selected to prevent Google from indexing sensitive information. Then click "Add drive or folder" and add the PC to the network so that you can search for files across the network without leaving your chair. Finally, install the plugin TweakGDS (free http://tinyurl.com/2nwxb9), which lets you designate a different folder on your hard drive, or save the Google index.

Uncover ‘No to All’ Option
When you copy multiple fi les from one place to another, Windows prompts you to crash whether duplicates exist. Select "Yes to All" can go a long way in preventing carpal tunnel, but where is "No to all button?" No, but you can force Windows to act as if it does, hold down the Shift down time from RST if you press No.

Delete an Undeletable File
Windows will not allow you to eliminate the en, if it is enabled, which is usually a good thing, but can not write bad news when trying to get rid of the system voltage of bad malware. Fortunately, there to go around. Click Start, click Run and type CMD to the command prompt. Now, press CTRL-ALT-DEL to open Task Manager. Processes tab, highlight explorer.exe and click End Process. Alt-Tab your way to the command prompt and change directory to the file you are trying to remove the cd command (cd C: \ Program Files \ 3DSaver). Then, use the Delete command to remove the offending file (del3DSaver.exe). Alt-Tab back to Task Manager, select New Task under File, then type explorer.exe to bring the Windows shell. Alternately, try Unlocker (free http://ccollomb.free.fr.unlocker/) and delete stubborn files in a GUI thin.

Stay Prepared with a Password Restore Disk
Open User Accounts in the Control Panel and select your account. Click the “Prevent a forgotten password” link in the left-hand pane and follow the prompts. If you’re on a domain, press CTRL-ALTDEL to bring up the Windows Security dialog box and then click Change Password. In the “Log on to” box, click the local computer, select Backup, and then follow the prompts. Both methods require a floppy disk.


Uninstall Hidden Components
Search sysoc.inf in the C: \ Windows \ inf and edit it with Notepad. (If you do not see the inf folder, click Tools, View and select "Show hidden files and folders.") Remove the word HIDE all entries to be displayed, such as WordPad or Pinball, then save the file. These are now displayed in the Add / Remove Windows components list.

Scan System Files for Corruption
Routine installation of malware and evil are only two ways of critical system files can become corrupt, but it is easy to undo the damage done to correct the third-party software. Click on the Start menu, select Run and type sfc / scannow to run XP file system control. Keep your Windows CD handy and insert it in the request.

Automatically Kill Processes and Shut Down Quicker
Teach how to disable Windows without harassing the process does not respond. Open the registry and go to HKEY_CURRENT_USER \ Control Panel Desktop \. AutoEndTasks Double click and change the value from 0 to 1. DoubleClick WaitToKillApp and then change the value from 5000 to 1000. Finally, double-click HungAppTimeout and change the value from 20,000 to 3,000.

Eliminate Lag and Speed up the Start Menu
A fully loaded rig pays dividends to everything from productivity applications to games, but no matter how fast your machine is the Start menu still lags. To give the menu a needed speed boost, click Start, select Run and type regedit. Navigate to HKEY_CURRENT_USER \ Control Panel \ Desktop, double click MenuShowDelay in the right pane and change the value from 400 to 5 Reboot and watch your start menu fly!

Apply One Folder’s View to All Folders
XP lets you view folders five different ways, miniatures, paintings, icons, list, details, but what you choose for a file does not apply to them. Of course, you can configure each individual folder, but it takes too long. To apply universally the same point of view, go to My Documents, click Tools, then Folder Options and select the View tab, and click Apply to All Folders.

Install Support Tools for Advanced Diagnostics
To be a true IT ninja, equip yourself with Windows Support Tools (free, http://tinyurl.com/yja7vw), a set of more than 100 troubleshooting utilities aimed at advanced users (view a complete list at http://tinyurl.com/2k42ex). Not all of them are gems, but a few notable standouts include pviewer, for gathering information about running processes on remote computers; msicuu, to remove installer information when a program’s uninstaller gets borked (power outage, for example); and windiff, to compare files and see which is more recent, along with lineby-line code comparisons.
 
Upgrade to Notepad++
Taking notes with Notepad is just a little more advanced than the chiseled into concrete, but we always find our fiction editor using the basic shopping list of quick doodles and writing HTML. With Notepad + + (without http://tinyurl.com/552wn), we can do both at the same time! A tabbed interface is one of the many features included, with an almost infinite range of material options, slide coding, multiview features, and more.

Goodbye MS Paint, Hello Paint.NET
Capable of photo-editing suites are often too expensive if all you're interested in is the occasional Doodle, and the learning curve requires an investment of more time. Solve both problems with Paint.NET (free, www.getpaint.net) that combines ease of use in MS Paint with enough features to unleash your inner Rembrandt!


Read More...

Minggu, 03 Juli 2011

How to Install an Aftermarket GPU Cooler: Very Carefully

An aftermarket GPU cooler is exceedingly complicated to install, and you run the risk of bricking your card if you do it wrong. Here’s the gist: You unscrew the stock heatsink on the card via the super-tiny screws on the underside of the card. Take care not to bend or otherwise grip your card too tightly and, for the love of all things holy, be gentle—but forceful—when removing the tiny screws.

Note the sheer size difference between the card’s
stock heatsink (far left) and our aftermarket cooler
on the right. Goodbye, noise!

You’ll have to clean off the GPU (rubbing alcohol works great) and likely apply more thermal paste to it and to any of the other raised components that touch your new heatsink. You’ll also have a complicated series of
washers, standoffs, and screws to fiddle with as you mount your new cooler in place—this varies based on the aftermarket cooler you’re using. No matter what, be careful: A videocard is a delicate object. Snap off or otherwise bump the wrong electronic element, and you’ll find yourself with a $300 coaster… or worse.
Taking a videocard down to its raw components—a circuit board and
chip, in this case—is an extremely delicate process.
You can easily brick a PC part.
Read More...

Clear up Hard Drive Space without Giving up Data


The Holiday season is just recently past, and a lot of good boys and girls will have gotten a PC game, application, or iTunes gift card in their stockings this year. However, in order to enjoy your new soft ware or media, you have to have enough hard drive wiggle room to use it. To get the job done, you could set out to delete a score of chunky media fi les and sizeable programs that you only use on occasion. You could also opt to purchase and install a larger hard drive to solve the problem. Either of these plans will do the trick, but before you start working over your fi les with a machete or plug in any new hardware, we’d suggest taking a few minutes to read our handy three-step guide on how to free up some hard drive space on your desktop or laptop without being forced to delete any important fi les. Let’s get to work!

1 DISC CLEANUP
No matter whether you’re a casual user or an enthusiast, your daily computing takes a toll on your hard drive. With all of the temporary Internet fi les piling up on your system, downloaded installation files, optional Windows components that you’ll never use, and Windows temporary files, it’s a wonder that any of us have any drive space left at all. To start whittling away at some of the unwanted bloat currently squatting on your hard disk platter, you needn’t look any farther than Windows 7’s Disk Cleanup tool. For a builtin feature, Disk Cleanup packs a pretty potent punch, and can start you off on the right foot to freeing up space. The fastest way to get cracking with Disk Cleanup is to simply type the program’s name into the Start Menu search field. Disk Cleanup off ers you a number of options regarding which files to keep or delete from your hard drive (image A). Just select the file types you want to do away with and click the OK button. Depending on how oft en you run Disk Cleanup, this operation can regain a lot of disk space for you, or a marginal amount. In either instance, it’s well worth the effort.

2 DECRAPIFY
We always recommend building your own system, but we know that some people can’t resist the temptation to buy pre-built. If that’s the case for you, you’ve likely got some bloatware kicking around your system. Bloatware—or crapware, as it’s sometimes known— is the unwanted, mostly useless soft ware that comes pre-loaded on your machine as a punishment for something you did in a past life. To get rid of bloatware, you could uninstall each unwanted application one at a time via the Windows Control Panel, or you can download the utterly awesome PC Decrapifi er (free for personal use, $20 for commercial users, www.pcdecrapifier.com) and do away with it all in one go.
The soft ware is a cinch to install, and provides options to run it as if it were installed on a new computer— with more robust bloatware-cleaning options—or on a computer that you’ve already set up and have been using for a while. Users are given the option of setting a system restore point to save your bacon should you run into any unforeseen errors while cleaning up your hard drive. After scanning your drive for suspiciously useless software, PC Decrapifier gives you the option to remove bloatware and other unwanted applications from your computer with no more effort than it takes to click your mouse a few times (image B).
3 CCLEAN UP YOUR ACT
While some folks might find they’re able to free up enough drive space to run their holiday spoils by cranking on Windows 7’s built-in Disk Cleanup utility or PC Decrapifier, others whose hard drives are truly packed to the gills may need something a bit hardier to get the job done. For such troubled souls, we suggest CCleaner (www.piriform.com).
When it comes to cleaning and optimizing your PC, there are few more robust tools available than CCleaner, and especially not for the low, low price of free.
Warning: During the software’s installation process, you’ll be asked whether or not you’d like to install Google Chrome and make it your default browser (image C). While we can appreciate the irony of being offered additional software while installing an application designed to remove bloat from an already overcrowded hard drive, you’re going to want to take the time to deselect the option to install Chrome before proceeding with your installation.

Once downloaded and installed on your system, CCleaner will make short work of just about anything you can throw at it (image D). Available as either a 32- or 64-bit application, CCleaner will not only clean the temporary files, history, cookies, download history, and form history from most modern browsers, it will also rip right into Windows itself, purging recent document history as well as the OS’s Log and Temporary files. Once it’s finished with the usual suspects, you can also choose to set CCleaner loose on your Registry to remove unwanted ActiveX controls, ClassIDs, old file extensions, questionable shared DLLs, and broken shortcuts. If that’s not enough for you, the software can also remove temporary and recent files from a truckload of popular applications like Microsoft Office, Google Toolbar, and Adobe Acrobat. Best of all, thanks to another free download called CCleaner Enhancer (http://bit.ly/hngyWu), the program’s functionality has been extended to cover an even wider range of software applications, and also allows you to set up a maintenance schedule so CCleaner will clean and maintain your hard drive from here on through to eternity.

Now that you’re armed with the tools you’ll need to get the job done right, there’s no excuse for you not to install your new software and get back to ignoring your family and friends. Read More...

Sabtu, 02 Juli 2011

Organize Your Media with XBMC


So, you’ve got a terabyte of media on your home PC—movies, music, TV shows, the works. On top of that, you like to watch streaming videos on the web and listen to Internet radio. Isn’t the future great? But how are you getting at all this media? Do you keep all your fi les in folders on your desktop, or are they just sitting on a NAS box? Maybe you use something like iTunes, and then fi re up your browser to get at streaming content.
1GETTING STARTED
Is XBMC right for me? XBMC (originally designed as the Xbox Media Center for hacked Xboxes, but now mostly for HTPCs) is the most compelling and full-featured media front end currently available. However, not everyone needs a media front end. If you’re a music-only sort of person, for instance, you might be better off using iTunes or Foobar. If the only media you need is streamed from Netflix, then you’re better off just sticking to the site.
Is my hardware ready to run XBMC? Fortunately, XBMC does not come with heavy system requirements. As long as you’ve got a semimodern computer running Windows, Linux, or OS X (don’t worry Mac-haters, we’re only going to focus on the Windows version in this article), you should be able to run XBMC. Really, the most stringent requirements will end up coming from the media fi les themselves. If your computer can run HD H.264 video, then it’s more than suffi cient for XBMC.
Is my media organized? Your media doesn’t need to be immaculately organized to use XBMC, but it does need to be somewhat orderly. First, your music needs to be properly tagged. Like most other music organization soft ware, XBMC uses ID3 tags to let you search through your music by its artist, album, or genre. If your music doesn’t have ID3 tags, you’ll lose out on a lot of functionality. If you purchased, downloaded, or ripped an MP3 in the last few years, it’s almost certainly got ID3 tags, but some older files might be missing them. If that’s the case, check out our article on using MediaMonkey to automatically add tags to your library at here.


Your video library doesn’t need any sort of tags, as XBMC uses “scrapers” to retrieve that data automatically from online databases. All the same, it’ll make your life a whole lot easier down the line if your videos aren’t spread out willy-nilly all over your hard drives. The best thing you can do is put all your movies in a single folder, and all your TV shows in another, with sub-folders for individual series/seasons.

2INSTALLING THE SOFTWARE
XBMC takes some work to get set up, but the soft ware installation itself is dead simple. Just download the latest Windows installer at http://xbmc.org/download and run it. You get some options about what components to install, but the defaults will be fi ne for now—you can change anything you need to later on. You’ll also be asked where you want XBMC to save its data and plugins. If you choose to store them in XBMC’s program folder, you’ll have to choose to run XBMC with administrator rights, but it will be easier to copy your XBMC install to a diff erent computer, plugins intact.
When the installation’s A done, fi re up XBMC.
3ADDING MEDIA
Your freshly installed XBMC is already looking snazzy, with a high-res skin and a slick user interface, but right now it’s sorely lacking in functionality. That’s because, so far, XBMC has no idea where your media files are. You can fix this problem by selecting one of XBMC’s libraries (the possible libraries are Videos, Music, Pictures, and Programs) and then selecting Add Source. We chose the Video library in this example.

As you might guess, the Add Source dialogue lets you specify a new source for media fi les—this can be a drive, a folder, a network location, or a combination of the three. If it’s a drive or a folder, you can either type the full path into the list, or click the Browse button and select the location. To add a network location (a NAS box, for instance) you just click Browse, then select “Add network location…” from the list. An alternative is to mount the network location as a drive on your system, then add the source that way.

A single source can draw from multiple locations, so it’s best to have one source for each “category” of media. For instance, we named our first source “Movies” and it contains (surprise!) all our movies. Once you’ve selected all the drive locations for your source, make sure that you’ve given it a name, and click on the Set Content button at the bottom of the window.
The Set Content menu is exclusive to Video sources, and lets you tell XBMC what kind of videos your video source contains. There are three options, with slightly different behaviors:
Movie A Movie source assumes that each video file is a single movie. If your movies are in folders (with subtitle files, for instance) you’ll need to check the option that says “Use folder names for lookups.” If you’ve got lots of nested folders with movies inside, you’ll need to check the option labeled “Scan recursively.”TV Show A TV source assumes that video files will be arranged in folders by series. Unlike a Movie source, TV sources are recursive by default.
Music Video A Music Video source assumes each file is a single music video. The primary difference with Music Videos is that you can enable Party mode, which tells XBMC to play files from Music Video sources at random.
Whichever type of source you select will also determine which scraper will be used to identify your videos. You can select from a large list of possible scrapers, but for most purposes the default is the best choice. Once you’ve added a video source, select that source and press the context key (C on the keyboard, by default) and select Scan for New Content. If everything is set up correctly, XBMC will find and download data for your files.
Adding music is a bit easier, since there’s no Set Content or scraper to deal with. Once you’ve added all the sources that you need, you can start using XBMC. Select the library you want to view with the up and down arrow keys, then press the right-arrow key, and select Library. You can now navigate through your entire video library—movies, TV shows, and music videos. If you want to change the view mode, just press the left-arrow key to access a small menu of view options.

4EXPANDING XBMC
By now, aft er (hopefully) only a halfhour or so of confi guration, XBMC is ready to go as a media front end. You can use it to browse and watch your local media in style, but you’ve still only scratched the surface of what XBMC can do.
One of the main strengths of XBMC, and a compelling reason to pick it over the also-excellent Windows Media Center, is its broad range of available scripts, skins, and plugins. We’ll show you how to use each to customize and expand your XBMC installation.
Skins We’ll start with the simplest add-ons—skins. Skins simply change the physical appearance (and sometimes layout) of XBMC. To find new skins for XBMC, check out the official XBMC skins page at http://xbmc.org/skins or in the official forums at http://bit.ly/doUmOd.
To install a skin that you’ve downloaded, you’ll need to go to XBMC’s application data folder. If you chose the default option during install, this will be in C:\Users\ username\AppData\Roaming\XBMC\. If you chose the portable option, the data folder will be in XBMC’s program directory. Open the Skins folder, create a folder for the skin you just downloaded, and drop the contents of the skin download into it. That’s pretty much it—you can find the Skin options in the Settings menu under Appearance. Try out skins until you find one you like.
Plugins  A plugin is an add-on that extends the functionality of XBMC without adding any fundamentally new features. A common form of plugin is one that hooks into an online video or audio source and lets you browse through its content in XBMC. XBMC comes with a built-in package manager called the SVN Repo installer, which allows you to download and install plugins automatically. It’s a little clunky, and there’s a better, community-made package manager called the XBMC Zone Installer available, so our first step is to get that.
Go to XBMC Zone (www.xbmczone.com) and download and unzip the XBMC Zone Installer. Installation works about the same as a skin—go to the application data directory, then open the directory called Plugins. Inside, you’ll see one folder for each library in XMBC (Videos, Music, Programs, etc.). A plugin has to go into one of the main categories—the default installer is in Programs, so we’ll go ahead and put XBMC Zone Installer there. Like a skin, simply drag all the unzipped plugin data into its own folder within the Programs folder.
Now, restart XBMC, and you’ll fi nd your new plugin by navigating down to Programs, then selecting Plugins. Starting a plugin like the XBMC Zone isn’t really like starting a new program, but rather like opening a new folder in XBMC. This is what separates plugins from scripts—scripts add new functionality, whereas plugins merely add new “locations” to XBMC. As an example, open the XBMC Zone Installer, then find and install the GameTrailers plugin. Now, if you go to your Videos library, and select the GameTrailers plugin, you can navigate through the GameTrailers streaming videos as though they were all on your hard drive.
One final word about plugins: For various reasons, many online content providers don’t like third-party programs scraping their content. We won’t wade into that particular debate here, but the practical upshot is that plugins (especially for major providers like TV networks) break frequently. If you install a plugin and it doesn’t work, do a quick Google search for the name of the plugin. There’s a good chance it might be out of order for the time being.Scripts Finally, we’ll get to the really meaty part of XBMC customization: scripts. Scripts are addons that add new functionality to XBMC in a more dramatic way than plugins. There are a lot of scripts available, and some require a bit more setting up than the plugins we’ve seen so far. Here are two of our favorites:
ROM Collection Browser Besides tons of media, a common thing to fi nd on a nerd’s NAS box is a classic game emulator and tons of ROMs. As with media, there are front endsthat allow you to organize all your emulatorsand ROMs, but then you have to run two separate front ends on your HTPC. Fortunately, there’s a script available for XBMC called ROM Collection Browser that adds a full-featured ROM browser and launcher to XBMC, allowing you to surf through andenjoy your games the same way you do movies and music.
To install it, hit the project’s home page at http://bit.ly/9M0R9i and download the script filles. Unzip them into a folder in XBMC’s scripts directory, just like with skins and plugins. Unlike a plugin, the ROM Collection Browser script needs some confi guration to work, and it’s not exactly user-friendly.
Configuring ROM Collection Browser is done by editing the confi g.xml fi le located in the plugin’s resources/databases folder. The config.xml fi le describes what your ROM library looks like to the script, allowing it to optimally catalogue your games. Fully describing the customization process would be a whole article of its own, but here’s the gist:

The first half of the confi g fi le describes general options for the script. For the most part, these can be left alone. In the second part of the fi le, each emulator you want to use is fully described, including information such as where the emulator is located, where the ROMs are located, and what information should be displayed while browsing the ROMs. It’s a bit daunting to look at at fi rst, but every XML fi eld is documented in the comments (the lines in the fi le preceded by a “<! –”), so if you read them carefully and pay close attention to the example emulator setups, you should be all right.
For more information on confi guring this script (and a functioning test setup) see the official documentation at http://bit.ly/ayHdUK.

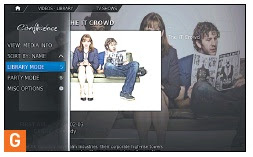
Grooveshark Another excellent example of what a script can do for XBMC is the Grooveshark add-on. This script allows you to access and surf the massive music library of the Grooveshark service (How is it so massive? Are they going to get sued? Nobody knows!) from within XBMC (image L). And unlike a simple plugin, the Grooveshark script allows you to log in with your Grooveshark username and password, so you can access and make changes to your playlists and favorites from within XBMC.

Unlike ROM Collection Browser, Grooveshark is pretty easy to get up and running. Just install the script (either through the package manager, or by downloading it from http://bit.ly/bSP9Mp), and run it in XBMC in the scripts menu. You’ll be asked for your login information, and then you’re good to go!
In this article we’ve only barely touched on all of the diff erent ways you can customize and extend XBMC. If you want to fi nd out more about all the options available, check out the offi cial community forums at http://forum.xbmc.org. Read More...

Real World Wireless Security

Rather than concentrating on the basics of general information security or wireless networking, this introductory chapter focuses on something grossly overlooked by many "armchair experts": The state of wireless security in the real world. Before getting down to it, though, there is a need to tell why we are so keen on the security of 802.11 standards-based wireless networks and not other packet-switched radio communications. Figure 1-1 presents an overview of wireless networks in the modern world, with 802.11 networks taking the medium circle.

Figure 1.1. An overview of modern wireless networks.
As shown, we tend to use the term 802.11 wireless network rather than 802.11 LAN. This particular technology dissolves the margin between local and wide area connectivity: 802.11b point-to-point links can reach beyond 50 miles in distance, efficiently becoming wireless wide area network (WAN) connections when used as a last mile data delivery solution by wireless Internet service providers (ISPs) or long-range links between offices. Thus, we consider specifying the use of 802.11 technology to be necessary: Local area networks (LANs) and WANs always had and will have different security requirements and approaches.

Why Do We Concentrate on 802.11 Security?

The widespread area of 802.11 network coverage zones is one of the major reasons for rising security concerns and interest: An attacker can be positioned where no one expects him or her to be and stay well away from the network's physical premises. Another reason is the widespread use of 802.11 networks themselves: By 2006 the number of shipped 802.11-enabled hardware devices is estimated to exceed 40 million units (Figure 1-2), even as the prices on these units keep falling. After 802.11g products hit the market, the price for many 802.11b client cards dropped to the cost level of 100BaseT Ethernet client cards. Of course there is a great speed disadvantage (5–7 Mbps on 802.11b vs. 100 Mbps on switched fast Ethernet), but not every network has high-speed requirements, and in many cases wireless deployment will be preferable. These cases include old houses in Europe protected as a part of the National Heritage. In such houses, drilling through obstacles to lay the cabling is prohibited by law. Another case is offices positioned on opposite sides of a busy street, highway, or office park. Finally, the last loop provider services via wireless are basically a replacement for the cable or xDSL link and 802.11b "pipe" is not likely to be a bottleneck in such cases, taking into account common xDSL or cable network 
Figure 1.2. The growth of the 802.11 wireless market.
802.11 networks are everywhere, easy to find, and, as you will see in this book, often do not require any effort to associate with. Even if they are protected by WEP (which still remains the most common security countermeasure on 802.11 LANs), the vulnerabilities of WEP are very well publicized and known to practically anyone with a minimal interest in wireless networking. On the contrary, other wireless packet-switched networks are far from being that common and widespread, do not have well-known and "advertised" vulnerabilities, and often require obscure and expensive proprietary hardware to explore. At the same time, 802.11 crackers commonly run their own wireless LANs (WLANs) and use their equipment for both cracking and home and community networking.
Attacks on GSM and GPRS phones are mainly related to unit "cloning," which lies outside the realm of network hacking to which this book is devoted. On the personal area network (PAN) side, the hacking situation is far more interesting to dive into from a network security consultant's viewpoint.
Attacks on infrared PANs are a form of opportunistic cracking based on being in the right place at the right time—a cracker would have to be close to the attacked device and be in a 30-degree zone from its infrared port. Because the infrared irradiation power is limited to 2 mW only, the signal is not expected to spread further than two meters. An exemption to the 30 degrees/2 mW limitations is the case when an infrared access point (e.g., Compex iRE201) is deployed in an office or conference hall. In such a situation, all that a cracker needs to sniff traffic and associate with the infrared PAN is to be in the same room with the access point. There is no layer 2 security in Infrared Data Association (IrDA) PANs and unless higher layers' encryption or authentication means are deployed, the infrared network is open for anyone to exploit. Windows 2000 and Windows XP clients automatically associate with other IrDA hosts and Linux IrDA project stack (http://irda.sourceforge.net/) provides a remote IrDA host discovery option (do irattach -s) as well as irdadump, which is a utility similar to tcpdump. Irdaping has been used to freeze dead unpatched Windows 2000 machines before the Service Pack 3 release (see the Bugtraq post at http://www.securityfocus.com/archive/1/209385/2003-03-11/2003-03-17/2). If you want to dump layer 2 IrDA frames under Windows 2000, an infrared debugger interface in rCOMM2k (a port of Linux IrDA stack, http://www.stud.uni-hannover.de/~kiszka/IrCOMM2k/English/) will do a decent job. However, no matter how insecure the infrared networks are, their limited use and physically limited spread means that scanning for data over light will never be as popular as scanning for data over radio frequency (RF) waves.
As such, warnibbling or looking for Bluetooth networks will gain much higher popularity than looking for infrared connections and might one day compete with wardriving in popularity. The tools for Bluetooth network discovery such as Redfang from @Stake and a graphical user interface (GUI) for it (Bluesniff, Shmoo Group) are already available to grab and use and more tools will no doubt follow suit.
Three factors limit the spread of Bluetooth hacking. One is the still limited use of this technology, but that is very likely to change in a few years. Another factor is the limited (if compared to 802.11 LANs) coverage zone. However, Class 1 Bluetooth devices (output transmission power up to 100 mW) such as Bluetooth-enabled laptops and access points can cover a 100-meter radius or greater if high-gain antennas are used. Such networks are de facto WLANs and can be suitable targets for remote cracking. The third factor is the security mechanisms protecting Bluetooth PANs against both snooping and unauthorized connections. So far there are no known attacks circumventing the E0 streaming cipher used to encrypt data on Bluetooth PANs. However, only time will determine if this proprietary cipher will stand Kerckhoffs's assumption and whether the famous story of the unauthorized Cypherpunks mail list disclosure of the RC4 algorithm structure will not repeat itself again (see Chapter 11 if you find this example confusing). There are already theoretical observations of possible Bluetooth security mechanism weaknesses (see http://www.tcs.hut.fi/~helger/crypto/link/practice/bluetooth.html). Besides, even the best security countermeasure is useless unless it is implemented, and Bluetooth devices are usually set to the first (lowest) security mode out of the three Bluetooth security modes available and have the default of "0000" as the session security PIN. It is also common to use the year of birth or any other meaningful (and guessable) four-digit number as a Bluetooth PIN. This happens for convenience reasons, but the unintended consequence is that it makes the cracker's job much easier. In our observations, about 50 percent of Bluetooth-enabled devices have the default PIN unchanged. There are also devices that have default PINs prewired without any possibility of changing them: all the attacker would have to do is find the list with the default PINs online. Although this provides a great opportunity for the potential attacker, we have yet to meet a real flesh-and-bone "warnibbler" who goes beyond sending prank messages via Bluetooth on the street. At the same time, security breaches of 802.11 networks occur on a daily, if not hourly, basis bringing us back to the main topic: Why and, most important, how they take place.

Getting a Grip on Reality: Wide Open 802.11 Networks Around Us
As mentioned, in the majority of cases an attacker does not have to do anything to get what he or she wants. The safe door is open and the goods are there to be taken. The Defcon 2002 wardriving contest showed that only 29.8 percent of 580 access points located by the contesters had WEP enabled. As much as 19.3 percent had default ESSID values, and (not surprisingly) 18.6 percent of discovered access points did not use WEP and had default ESSIDs. If you think that something has changed since then, you are mistaken. If there were any changes, these were the changes for the worse, because the Defcon 2003 wardrive demonstrated that only approximately 27 percent of networks in Las Vegas are protected by WEP. Because one of the teams employed a lateral approach and went to wardrive in Los Angeles instead, this number also includes some statistics for that city.
The Defcon wardrive observations were independently confirmed by one of the authors wardriving and walking around Las Vegas on his own.
Are things any better on the other side of the Atlantic? Not really. We speculated that only around 30 percent of access points in the United Kingdom would have WEP enabled. To validate this for research purpose, one of the authors embarked for a London Sightseeing Tour in the famous open-top red double-decker bus armed with a "debianized" laptop running Kismet, Cisco Aironet LMC350 card, and 12 dBi omnidirectional antenna. During the two-hour tour (exactly the time that laptop's batteries lasted), 364 wireless networks were discovered, of which 118 had WEP enabled; 76 had default or company name and address ESSIDs. Even worse, some of the networks discovered had visible public IP addresses of wireless hosts that were pingable from the Internet side. If you are a wireless network administrator in central London and are reading this now, please take note. Of course, in the process of collecting this information, no traffic was logged to avoid any legal complications. The experiment was "pure" wardriving (or rather "warbusing") at its best. Not surprisingly, warwalking in central London with a Sharp Zaurus SL-5500 PDA, D-Link DCF-650W CF 802.11b card (wonderful large antenna, never mind the blocked stylus slot), and Kismet demonstrated the same statistics. A similar level of 802.11 WLAN insecurity was revealed in Bristol, Birmingham, Plymouth, Canterbury, Swansea, and Cardiff.
Crossing the English Channel does not help either. One of the authors has driven from Warsaw to London with another Zaurus/D-Link CF card/Kismet kit and found a similar ratio of WEP/noWEP 802.11 networks, including very powerful unencrypted point-to-point links crossing the countryside motorways in the middle of nowhere. Another author has evaluated 802.11 security in Riga, Latvia. Curiously, the wireless networks in Riga were so abundant that it was practically impossible to use the middle ISM band (2.4–2.45 GHz) and many networks moved to the UNII (5.15–5.35 and 5.725–5.825 GHz) or even licensed ~24 GHz bands. Many legacy Breeznet and 802.11 FHSS networks were present. The wireless boom in Riga can be explained by old, noisy, Soviet-period phone lines incapable of carrying xDSL traffic without a significant packet loss/retransmission rate. Yet, despite the popularity of 802.11 networks, hardly anyone used WEP.
If you think that the majority of these unprotected wireless networks were home user access points, wireless community networks, or public access hot spots, you are wrong. Many of the wide open networks we have observed "in the wild" belong to government organizations (foreign governments included) and large corporations (multinationals included). In fact, some of these corporations are major information technology (IT) enterprises or IT-related consultancies, which is particularly shameful! We don't even dare to think how many of the 802.11 networks located had implemented proper security measures beyond the standard ("crackable") WEP and MAC address filtering. Single-digit percentage values surely come to mind. Considering that both WEP and MAC filtering are not difficult to circumvent with a bit of patience, it is not surprising that security remains the major concern restricting the spread and use of wireless technology around the world. At the same time, there are efficient wireless security solutions available, including powerful and affordable free and Open Source-based wireless safeguards that we describe in the second part of this book. Unfortunately, very few wireless network engineers and administrators are aware of the existence of these solutions. As always, human factor proves to be the weakest link.

The Future of 802.11 Security: Is It as Bright as It Seems?
Will the new 802.11 standards alleviate this situation? Again, only time will tell. While this book was being written, many manufacturers started to release 802.11g equipment onto the market, even though the 802.11g standard was not complete (see Figure 1-3 for reference on 802.11g development process). A great deal of these pre-802.11g products were advertised as "ultrasecure due to the new standard." In reality, 802.11g has nothing to do with security at all. In a nutshell, it is an implementation of the 802.11a orthogonal frequency division multiplexing (OFDM) physical layer modulation method for a middle ISM band to provide 802.11a speed (54 Mb/s is a standard-defined maximum), thus achieving both high connection speed and 802.11b or even the original 802.11 direct sequence spread spectrum (DSSS) standards compatibility. Therefore, the marketing attempts trying to link 802.11g and security were blatantly false. 
Figure 1.3. 802.11i development process.


On the other hand, the 802.11i standard (still in draft at the time of this writing) is the new wireless security standard destined to replace WEP and provide much stronger wireless security according to its developers. 802.11i was supposed to be released together with 802.11g, but we are not living in a perfect world. Wireless Protected Access (WPA) WiFi Alliance certification version 1 implements many of the current 802.11i development features, but not every 802.11g product currently sold is WPA certified. At the moment, there are many 802.11g networks deployed that still run old, insecure versions of WEP, and we have observed 802.11g LANs without any data encryption enabled by security-unaware administrators. A detailed description of 802.11i is beyond the reach of this introductory chapter and impatient readers are referred to Chapter 10 for the 802.11i structure and function discussion.
What deserves to be mentioned here are the issues of wireless hardware replacement, backward compatibility, personnel training, and falling prices on older 802.11 equipment (combined with higher prices on newly released 802.11g with 802.11i support products) mean that the old vulnerable WEP is with us to stay. This will happen even if 802.11i finally makes it and is unbreakable (very few security safeguards are, if any). Just as in the previously mentioned case of Bluetooth security, there will be users and even system administrators who forget to turn 802.11i security features on or leave the default or obvious key value unchanged. Also, as you will see, WLANs will still remain vulnerable to denial of service (DoS) attacks on both the first and second layers. A vile and determined attacker can use this to his or her advantage, bringing down the network only when 802.11i security features are enabled, thus playing a "Pavlovian game" against the wireless administrator. (When the authentication or encryption is on, the network doesn't work properly!) Thus, an opportunity for a cracker to sneak in will always remain a specific threat to wireless networks to be reckoned with.

Summary

Despite the claims of wireless vendors' marketing departments and opinions of some "security experts," stating that "everyone is using WEP and it still provides a realistic level of security," real-world 802.11 security is next to abysmal. There are many factors contributing to this situation, both technical and administrative. Human factors, primarily the lack of user and even system administrator education, is the highest source of wireless insecurity in our opinion. As such, it is not going to disappear when newer, more secure standards become universally accepted. Thus, many security problems faced by modern wireless networks will persist for years ahead.

Read More...